
What’s the difference?
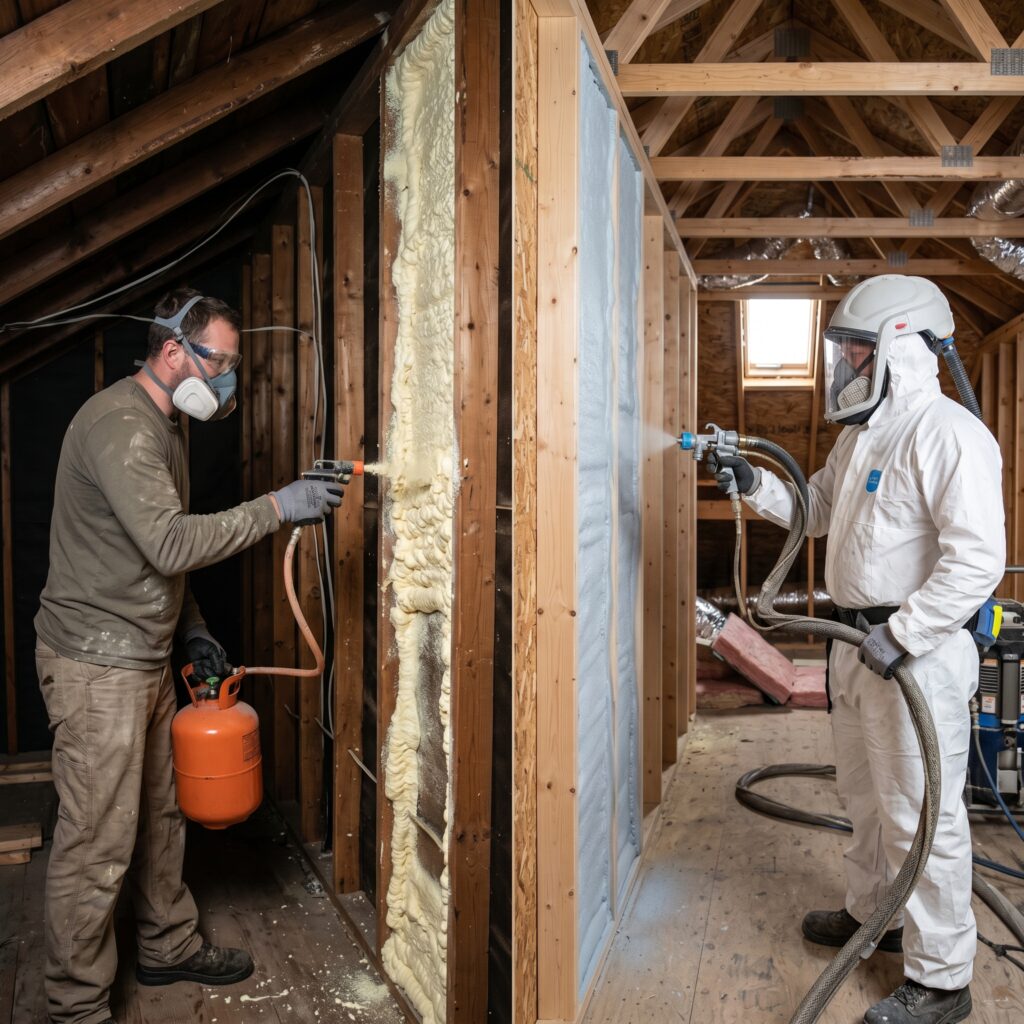
Ontario homeowners in 2026 face a straightforward but high-stakes choice: tackle spray foam insulation themselves with a kit, or hire professionals. DIY kits—typically closed-cell or open-cell aerosol cans costing $200–$800 CAD—offer control and upfront savings. Professional crews, costing $1,500–$5,000+ CAD for equivalent coverage, bring equipment, expertise, and warranties. The real difference isn’t just price. It’s about coverage uniformity, fire-code compliance, long-term R-value retention, and what happens when application goes wrong. An improperly installed DIY kit can leave thermal bridges, compromise structural integrity, or create moisture problems that take years to surface. A professional install typically includes site assessment, proper ventilation planning, and warranty protection. For many Ontario homeowners, the decision hinges on project scope, local bylaw requirements, insurance implications, and risk tolerance. This guide walks through both paths so you make an informed choice aligned with your home’s needs and your comfort level.
Side-by-side comparison
| Scenario | Cost (CAD) | Timeline | Permit Needed? | When to Choose | Risk if Wrong |
|---|---|---|---|---|---|
| DIY Kit (small attic/crawlspace) | $300–$800 | 1–3 days (with drying) | No (usually) | Small, accessible areas; low-risk spots | Uneven coverage, thermal gaps, moisture trapping |
| DIY Kit (medium basement rim) | $600–$1,500 | 2–5 days | No (usually) | Budget-conscious, simple geometry | Cold spots, drafts, fire-code violations, voided insurance |
| Professional (small attic/crawlspace) | $1,500–$2,500 | 1 day (same-day completion) | Depends on coverage (check local AHJ) | Peace of mind, code compliance, warranty | Cost overrun if structural issues found on-site |
| Professional (medium basement rim) | $2,500–$4,500 | 1–2 days | Yes (most municipalities) | Complex geometry, permit requirement, insurance protection | Minimal—warranty typically covers defects for 10–25 years |
| Professional (whole-home envelope) | $4,500–$8,000+ | 3–5 days | Yes | Major renovation, maximum energy savings, resale value | Minimal—full coverage and warranty |
| Hybrid (DIY foundation, pro attic) | $2,000–$3,500 | 2–4 days | Maybe (AHJ-dependent) | Mixed skill levels, budget constraints | Inconsistent performance, warranty gaps |
DIY spray foam kits — when it’s the right call
DIY spray foam kits make sense for specific, low-risk applications. If you’re sealing small gaps around rim joists, insulating an accessible attic corner, or filling cavities in a detached garage, a kit delivers results at a fraction of professional cost. Kits are user-friendly now: handheld applicators, clearer safety instructions, and online tutorials make the learning curve manageable for a mechanically minded homeowner.
The math works best for projects under 500 square feet in straightforward geometry. You’ll spend $300–$800 on materials, a weekend of labor, and avoid the $1,500–$2,500 professional markup. For many Ontario homeowners, that’s compelling, especially if the area won’t significantly affect heating bills or code compliance.
DIY also works when you’re doing exploratory or temporary work—testing whether spray foam solves a draft before committing to a full professional job, or filling a seasonal gap in a secondary structure. Some homeowners use DIY kits for touch-ups between professional visits, filling new cracks or voids that emerge over time.
Success hinges on realistic expectations. You won’t achieve the uniform R-value density, air-seal perfection, or structural foam strength of a pro spray rig. You’ll also invest personal time, risk skin contact (wear gloves), and manage disposal of application residue. If you’re detail-oriented, patient, and okay with imperfection, DIY works. If you expect flawless results or need code sign-off, don’t attempt it yourself.
Professional spray foam — when it’s the right call
Hire professionals when the project is large, visible, or code-critical—or when you can’t afford failure. Professional crews bring truck-mounted equipment, multi-component spray systems, and trained applicators who dial in precise pressure, temperature, and mixing ratios. The result: consistent cell structure, proper expansion, and uniform R-values across the entire job.
Professional work is mandatory for any full-envelope insulation, basement waterproofing, or work subject to municipal permit. Ontario’s building code increasingly requires air-sealing and thermal continuity in renovations; professionals understand those requirements and design systems to pass inspection. They also carry liability insurance and warranties—often 10–25 years—that protect you if the foam fails, settles, or creates moisture issues.
The upfront cost is higher ($1,500–$8,000+ CAD depending on scope), but the long-term value is clear. Professionals finish in one or two days; DIY stretches across weeks. They manage cleanup, disposal, and ventilation properly. They also identify structural problems before foam goes in—rotting rim joists, mold, or plumbing conflicts—and adjust the plan. If your home is part of an older Ontario neighborhood with varied construction standards or if you’re selling within five years, professional work strengthens resale appeal and warranty transferability.
For attics, crawlspaces, and rim joists—the highest-impact areas for Ontario heating losses—professional spray foam delivers the best return on investment. It also eliminates the risk of personal injury, chemical exposure, or incomplete coverage that could haunt you for years.
Edge cases and Ontario-specific factors
Ontario’s building code and municipal bylaws vary significantly. Toronto, Ottawa, and suburban regions have different permit thresholds and inspection requirements. If you’re insulating a basement rim, most municipalities require a permit and inspection; DIY work done without permits can void insurance claims if water damage or mold occurs later. A professional contractor files permits, schedules inspections, and ensures compliance—removing that liability from your shoulders.
Heritage homes and older neighborhoods sometimes have additional bylaws. If your home is heritage-designated or in a protected district, spray foam application may trigger review. Insurance is another hidden cost: some insurers deny claims on DIY-insulated areas if defects contribute to water damage or fire spread. A professional install, backed by warranty and evidence of code compliance, is always insurable.
Ventilation and moisture control are critical in Ontario’s humid summers and cold winters. Improper foam application can trap moisture in walls, leading to mold growth by year two. Professionals assess existing ventilation, add baffles if needed, and design the foam system to work with your home’s existing climate control. They also understand the interaction between foam, vapor barriers, and mechanical ventilation—knowledge that DIY kits assume you already have.
Neighborhood considerations matter too. If you’re in a condo or planned community, renovation bylaws may restrict when and how insulation work happens. Professional crews work within those time windows and carry proof of compliance. Finally, if you’re planning a future insurance claim or resale, a professional installation—with permits, inspections, and warranty—is always defensible.
Frequently asked questions
How much can I save with a DIY kit vs. hiring professionals?
For a small attic or crawlspace (100–300 sq ft), DIY costs $300–$800 in materials; professional work runs $1,500–$2,500. That’s a $700–$1,700 savings upfront. However, if the DIY job needs professional correction later, you’ll pay the full professional cost plus labor to remove failed foam, erasing the savings. For larger projects or code-critical work, the DIY savings shrink further relative to professional warranty protection and insurance compliance.
Will a DIY spray foam kit void my homeowners insurance?
Not automatically, but it may complicate claims. If water damage or mold occurs in a DIY-insulated area and the insurer suspects poor application contributed to the problem, they can deny the claim. Professional work with permits, inspections, and warranty documentation is always defensible in a claim. Contact your insurer before starting any DIY foam project to confirm coverage.
Do I need a permit for DIY spray foam in Ontario?
It depends on scope and location. Small attic or crawlspace gaps usually don’t require permits. Basement rim work, foundation insulation, or anything that affects fire-rating or air-sealing typically does. Check with your local authority having jurisdiction (AHJ) or municipal building department before starting. Professional contractors handle permit research and filing, removing the guesswork.
How long does spray foam last, and do DIY kits perform the same as professional foam?
Professional closed-cell foam typically lasts 30+ years with minimal R-value loss. DIY kits use similar chemistry but are applied by hand at lower pressure, resulting in inconsistent density and potential air pockets. Over 5–10 years, uneven DIY foam can settle or degrade faster than uniform professional work. Both should last decades if applied correctly, but professional application is more predictable long-term.
What’s the biggest mistake DIY homeowners make with spray foam?
Underestimating the importance of ventilation and moisture control. Many DIYers apply foam to seal air leaks without considering whether trapped moisture can escape elsewhere. This leads to mold, wood rot, or foam deterioration. Professional installers design ventilation paths and use complementary materials (like vapor barriers or baffles) to prevent these problems. DIY kits rarely include that system-level thinking.
Can I combine DIY foam with professional work, or should I choose one approach?
You can combine them strategically. For example, hire professionals for critical areas (basement rim, attic trusses) and use DIY kits for small supplementary gaps. However, warranty and liability become muddied—a professional won’t warranty areas they didn’t install. If the combined system fails, you won’t know who’s responsible. A cleaner approach is full professional work or full DIY, depending on project scope and risk tolerance.
Bottom line
Choose DIY if: You’re insulating a small area (under 300 sq ft), the geometry is simple and accessible, you’re comfortable with imperfect coverage, no permit is required, and you accept the risk of uneven R-value and potential moisture issues. DIY kits are ideal for garage gaps, small attic corners, or temporary sealing in detached structures. Budget $300–$800 and expect to spend a weekend on the job.
Choose professional work if: The project is large, code-critical, or in a moisture-sensitive area (basement, crawlspace). Choose professionals if a permit is required, you want a warranty, resale appeal matters, or you value single-day completion. For any full-envelope work or if you’re unsure about permits and compliance, professionals eliminate risk. Budget $1,500–$8,000 CAD and expect same-day or two-day turnaround.
For most Ontario homeowners, professional spray foam insulation is the smarter choice. The cost difference shrinks when you factor in time, insurance risk, and potential correction work. If you’re uncertain about your project, get a free assessment from a qualified local contractor. Organizations like attic insulation, basement insulation, and crawlspace insulation specialists can evaluate your home and recommend the right approach. Visit sprayfoamkings.ca for a free quote—many Ontario homeowners find that professional work costs less than they expected and delivers energy savings that pay for itself in 3–5 years.
Whether you choose DIY or professional, the goal is the same: seal air leaks, improve thermal comfort, and reduce heating costs. Make the choice that aligns with your skills, budget, and risk tolerance—and don’t hesitate to ask experts for help if you’re uncertain.